# SpringBoot3教程 - 20 自定义Starter
Starter
也就是场景启动器,通过 Starter
可以简化项目的依赖管理,在开发的时候,只需要引入指定的 Starter
,而无需关心底层的依赖关系。同时 Starter
中可以包含配置信息和自动配置类,使得集成更加便捷,降低项目复杂性,提高开发效率。
而通过自定义 Starter
,我们可以将一些通用的功能或组件进行封装,可以在多个项目之间进行共享和复用,减少重复代码和配置。各个项目也可以有统一的配置标准,减少配置差异和错误,提高代码质量和一致性。
通过前面自动配置原理的学习,下面我们来介绍一下自定义 Starter
的实现。
# 20.1 自定义Starter说明
# 1 Starter模块说明
Starter 一般由两个模块构成:
xxx-autoconfigure
模块,提供自动配置功能;xxx-starter
模块,提供依赖管理功能,然后在 xxx-starter 模块引入xxx-autoconfigure
模块。
查看官方的 starter,例如 spring-boot-starter
:
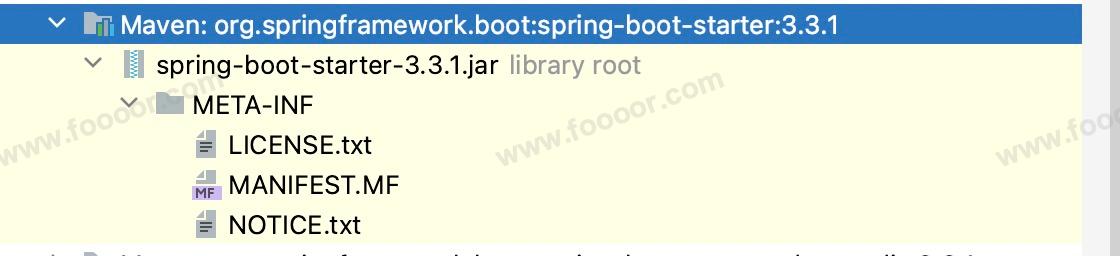
可以看到其中没有任何的java代码,通过项目的pom.xml去查看依赖,跳进 spring-boot-starter
的pom.xml,可以看到最终依赖了spring-boot-autoconfigure
。
所以启动器只用来做依赖导入,另外专门来写一个自动配置模块,启动器依赖自动配置;使用 Starter 的人只需要引入启动器(Starter),启动器再自动导入自动配置模块。
# 2 Starter名称说明
编写 Starter 的名称,我们还是不要太随意,按照指定的格式,规范且专业:
SpringBoot 官方Starter的名称都是如下格式:
- 格式:
spring-boot-starter-模块名
- 举个栗子:
spring-boot-starter-web
、spring-boot-starter-jdbc
。
自定义 Starter 的名称一般使用如下格式:
- 格式:
模块-spring-boot-starter
- 举个栗子:
mybatis-spring-boot-starter
、jasypt-spring-boot-starter
。
所以这里我们也按照这个格式。
下面开始创建项目。
# 20.2 创建项目
编写 Starter 需要编写 starter 模块和 autoconfigurer 模块,所以我们先新建一个空项目,然后在这个空的项目中新建两个模块。
创建空项目:
创建完成,然后再创建 starter 模块和 autoconfigurer 模块。
创建 starter 模块,右键项目 -> New -> Module
:
创建 autoconfigure 模块,右键项目 -> New -> Module
:
创建完成,将两个模块下没有用的东西(自动创建的类,和test包)删除,删除后如下:
# 20.3 编写autoconfigure模块
在 autoconfigure 模块中提供的整个 Starter 的主要的功能,这里只是为了演示,提供的功能不重要,这里就简单编写一个 service,提供一个方法,拼接的一句话。
# 1 首先引入依赖
首先引入 SpringBoot 的依赖,这样才能实现自动注入的相关功能。其他的依赖,需要什么依赖引入什么依赖就可以了。
添加 maven-compiler-plugin
查看,否则打包报错。
<project xmlns="http://maven.apache.org/POM/4.0.0" xmlns:xsi="http://www.w3.org/2001/XMLSchema-instance"
xsi:schemaLocation="http://maven.apache.org/POM/4.0.0 http://maven.apache.org/xsd/maven-4.0.0.xsd">
<modelVersion>4.0.0</modelVersion>
<groupId>com.doubibiji</groupId>
<artifactId>doubi-spring-boot-starter-autoconfigure</artifactId>
<version>1.0-SNAPSHOT</version>
<packaging>jar</packaging>
<name>doubi-spring-boot-starter-autoconfigure</name>
<url>http://maven.apache.org</url>
<properties>
<project.build.sourceEncoding>UTF-8</project.build.sourceEncoding>
</properties>
<dependencies>
<dependency>
<groupId>org.springframework.boot</groupId>
<artifactId>spring-boot-starter</artifactId>
<version>3.3.1</version>
</dependency>
<dependency>
<groupId>org.projectlombok</groupId>
<artifactId>lombok</artifactId>
<version>1.18.32</version>
<optional>true</optional>
</dependency>
</dependencies>
<build>
<plugins>
<plugin>
<groupId>org.apache.maven.plugins</groupId>
<artifactId>maven-compiler-plugin</artifactId>
<version>3.11.0</version>
<configuration>
<source>17</source>
<target>17</target>
</configuration>
</plugin>
</plugins>
</build>
</project>
2
3
4
5
6
7
8
9
10
11
12
13
14
15
16
17
18
19
20
21
22
23
24
25
26
27
28
29
30
31
32
33
34
35
36
37
38
39
40
41
42
43
44
45
46
# 2 编写配置类
创建一个配置类,以后别的项目引入现在编写的这个starter,那么在项目的 application.yaml 中配置指定的属性,就可以注入到下面的配置类中:
package com.doubibiji.config;
import lombok.Data;
import org.springframework.boot.context.properties.ConfigurationProperties;
@Data
@ConfigurationProperties(prefix = "doubi")
public class DoubiProperties {
// 属性是随意定义的,主要演示属性注入,在后面的service中使用
private String prefix;
private String suffix;
}
2
3
4
5
6
7
8
9
10
11
12
13
14
15
注意:上面的 @ConfigurationProperties
此时会报错,待会需要编写自动配置类,来引入这个配置类。
# 3 编写Service
首先编写一个 Service, 提供一个方法。
将配置类注入到 service 中,读取配置类的属性,拼接字符串返回,如此而已。
package com.doubibiji.service;
import com.doubibiji.config.DoubiProperties;
import org.springframework.beans.factory.annotation.Autowired;
public class DoubiService {
@Autowired
private DoubiProperties doubiProperties;
/**
* 提供的方法
*/
public String sayHello(String name) {
return doubiProperties.getPrefix() + " " + name + " " +doubiProperties.getSuffix();
}
}
2
3
4
5
6
7
8
9
10
11
12
13
14
15
16
17
注意,这里 service 没有使用 @service 注解,后面在自动配置类中进行注册,否则别的项目集成这个自定义 Starter,可能扫描不到这个 Starter 中的组件。
# 4 编写自动配置类
编写一个自动配置类,对 Bean 进行注册。
使用 @AutoConfiguration
注解,并使用 @EnableConfigurationProperties
注解将 DoubiProperties
配置类注入到 Spring IOC 容器。添加完 @EnableConfigurationProperties
注解, DoubiProperties
配置类的 @ConfigurationProperties
注解才不会报错。
package com.doubibiji.config;
import com.doubibiji.service.DoubiService;
import org.springframework.boot.autoconfigure.AutoConfiguration;
import org.springframework.boot.context.properties.EnableConfigurationProperties;
import org.springframework.context.annotation.Bean;
@AutoConfiguration
@EnableConfigurationProperties(DoubiProperties.class)
public class DoubiAutoConfiguration {
@Bean
public DoubiService doubiService() {
return new DoubiService();
}
}
2
3
4
5
6
7
8
9
10
11
12
13
14
15
16
17
# 5 编写imports文件
创建 resources 目录,在其下创建 META-INF
文件夹,在 META-INF
文件夹下创建 spring
文件夹,在 spring
文件夹下创建 org.springframework.boot.autoconfigure.AutoConfiguration.imports
文件,然后在文件中添加自动配置类 DoubiAutoConfiguration
的全类名。
com.doubibiji.config.DoubiAutoConfiguration
这个文件是 spring-boot-starter-autoconfigure
模块负责解析的,SpringBoot 项目都会引入 spring-boot-starter-autoconfigure
的依赖,所以不用我们来解析。
# 6 编译安装
autoconfigure 模块已经编写完了,可以使用 Maven,分别执行一下 compile 和 install,编译和安装到 Maven 仓库,这样在别的模块可以找到。
# 20.4 编写starter模块
autoconfigure 模块已经编写完成了,下面来编写 starter 模块,starter 模块主要是管理依赖的,所以没有代码。
只需要在 starter 模块的 pom.xml 文件中添加依赖即可。首先就是添加 autoconfigure 模块的依赖,另外需要将 autoconfigure 模块的依赖全部添加到 starter 模块中,因为在使用这个自定义的 Starter 的时候,只需要引入 starter 模块,而在使用 Starter 的时候如果想替换排除 Starter 中的依赖,这样做就比较方便。
pom.xml
<project xmlns="http://maven.apache.org/POM/4.0.0" xmlns:xsi="http://www.w3.org/2001/XMLSchema-instance"
xsi:schemaLocation="http://maven.apache.org/POM/4.0.0 http://maven.apache.org/xsd/maven-4.0.0.xsd">
<modelVersion>4.0.0</modelVersion>
<groupId>com.doubibiji</groupId>
<artifactId>doubi-spring-boot-starter</artifactId>
<version>1.0-SNAPSHOT</version>
<packaging>jar</packaging>
<name>doubi-spring-boot-starter</name>
<url>http://maven.apache.org</url>
<properties>
<project.build.sourceEncoding>UTF-8</project.build.sourceEncoding>
</properties>
<dependencies>
<dependency>
<groupId>com.doubibiji</groupId>
<artifactId>doubi-spring-boot-starter-autoconfigure</artifactId>
<version>1.0-SNAPSHOT</version>
</dependency>
<dependency>
<groupId>org.projectlombok</groupId>
<artifactId>lombok</artifactId>
<version>1.18.32</version>
<optional>true</optional>
</dependency>
</dependencies>
<build>
<plugins>
<plugin>
<groupId>org.apache.maven.plugins</groupId>
<artifactId>maven-compiler-plugin</artifactId>
<version>3.11.0</version>
<configuration>
<source>17</source>
<target>17</target>
</configuration>
</plugin>
</plugins>
</build>
</project>
2
3
4
5
6
7
8
9
10
11
12
13
14
15
16
17
18
19
20
21
22
23
24
25
26
27
28
29
30
31
32
33
34
35
36
37
38
39
40
41
42
43
44
45
46
然后使用 Maven进行 compile 和 install 一下、
# 20.5 使用自定义starter
新建一个 SpringBoot 模块,然后在模块中引入自定义的 Starter,看是否能直接使用 Starter 中的 service,并调用其中的方法。
# 1 新建测试的SpringBoot模块
新建一个 SpringBoot 模块,直接使用 Spring Initializr
创建就好了。
# 2 引入自定义Starter
首先就是在 pom.xml 中引入自定义的 Starter 依赖。
<dependency>
<groupId>com.doubibiji</groupId>
<artifactId>doubi-spring-boot-starter</artifactId>
<version>1.0-SNAPSHOT</version>
</dependency>
2
3
4
5
# 3 添加配置
上面自定义 Starter 中需要读取一个配置,所以在 application.yaml 中添加如下配置:
doubi:
prefix: Hello
suffix: Nice to meet you!
2
3
# 4 测试
这里直接在测试类中测试,看能否注入 Starter 中的 service,并调用其中的方法即可。
package com.doubibiji.doubistartertest;
import com.doubibiji.service.DoubiService;
import org.junit.jupiter.api.Test;
import org.springframework.beans.factory.annotation.Autowired;
import org.springframework.boot.test.context.SpringBootTest;
@SpringBootTest
class DoubiStarterTestApplicationTests {
@Autowired
private DoubiService doubiService;
@Test
void contextLoads() {
String str = doubiService.sayHello("Doubi");
System.out.println(str);
}
}
2
3
4
5
6
7
8
9
10
11
12
13
14
15
16
17
18
19
20
21
执行结果:
Hello Doubi Nice to meet you!
# 20.6 项目结构
我的项目结构如下: