Appearance
Vue2教程 - 17 路由
什么是路由?
路由是构建单页面应用(SPA)的重要组成部分,使用路由可以通过不同的URL路径来访问不同的页面组件,而无需重新加载整个页面。
也就是说路由可以根据不同的URL实现页面组件的切换,不需要重新加载整个页面。
17.1 vue-router
Vue2 中的路由是由 vue-router 库提供的,它是一个为 Vue.js 应用设计的官方路由管理器,它和Vue.js的核心深度集成。
也就是说在Vue2 中时候用 Vue Router 实现路由管理。
1 vue-router安装
我们在使用 vue-cli 创建项目的时候,如果勾选了 router,那么在创建的项目中是集成了 vue-router 的。在项目 src 下会生成router 文件夹,在文件夹下会有 index.js ,其中配置了初始项目的路由配置:
router/index.js
js
import Vue from 'vue'
import VueRouter from 'vue-router'
import Home from '../views/Home.vue'

Vue.use(VueRouter)

const routes = [
  {
    path: '/',
    name: 'Home',
    component: Home
  },
  {
    path: '/about',
    name: 'About',
    component: () => import('../views/About.vue')
  }
]

const router = new VueRouter({
  mode: 'history',
  base: process.env.BASE_URL,
  routes
})

export default router
在上面代码中创建了 VueRouter 对象,在 routes 中定义了各个页面的路由。
并在项目的 main.js 中引入路由配置:
js
import Vue from 'vue'
import App from './App.vue'
import router from './router'
import store from './store'

Vue.config.productionTip = false

new Vue({
  router,
  store,
  render: h => h(App)
}).$mount('#app')
如果在创建项目的时候没有勾选安装 vue-router,那么需要用 npm 或 cnpm 来进行安装的。打开命令行工具,进入你的项目目录,输入下面命令。
shell
# npm安装
npm install vue-router@3

# yarn安装
yarn add vue-router@3
在 Vue2 中只能使用 vue-router3 版本。
然后在 src 目录下新建 router 文件夹,然后在其下新建 index.js,并编辑内容如下:
js
import Vue from "vue";
import VueRouter from "vue-router";

Vue.use(VueRouter);

const routes = [
  // 后面在这里配置路由
];

const router = new VueRouter({
  routes,
});

export default router;
在上面的代码中创建 VueRouter 实例并导出,然后在项目的 main.js 中导入路由对象。
main.js
js
import Vue from 'vue'
import App from './App.vue'
// 引入路由,如果是index就不用写了
import router from "./router";

Vue.config.productionTip = false

new Vue({
  router,
  render: h => h(App),
}).$mount('#app')
在 main.js 中导入路由并传入到 Vue 实例中。
17.2 使用vue-router
下面来学习如何使用 Vue Router,通过两个按钮实现两个组件页面的切换。
在登录和首页之间进行切换。
1 创建页面
首先创建两个页面,其实页面也是组件,我们将页面放在 src/pages 目录下。
一般将页面放在
src/pages目录下,将组件放在src/components目录下。
HomePage.vue
vue
<template>
    <div class="home">
        <div>首页</div>
    </div>
</template>

<script>
export default {
    name: 'HomePage'
}
</script>
LoginPage.vue
vue
<template>
    <div class="login">
        <div>登录</div>
    </div>
</template>
<script>
export default {
    name: 'LoginPage'
}
</script>
2 配置路由
在 router/index.js 中导入页面组件,并进行路由配置:
js
import Vue from "vue";
import VueRouter from "vue-router";
// 1.引入页面组件
import HomePage from "@/pages/HomePage.vue";

Vue.use(VueRouter);

// 2.配置页面路由
const routes = [
    {
        path: "/home",
        name: "home",
        component: HomePage,
    },
    {
        path: "/login",
        name: "login",
        component: () => import("@/pages/LoginPage.vue"),
    },
];

const router = new VueRouter({
    routes,
});

export default router;在上面添加了两个页面的路由,path 表示访问页面的路由,name 是可选的,但是后面在代码中编程的时候,可以通过名称来跳转和控制。 component 表示的是页面组件,上面使用了不同的方式,LoginPage.vue的引入使用了动态导入(即懒加载)的方式,这有助于减少应用的初始加载时间。component: () => import("@/pages/LoginPage.vue"), 这行代码意味着当路由到 /login时,LoginPage.vue 组件会被动态地加载。
3 使用路由
下面在 App.vue 组件中使用路由。
vue
<template>
  <div id="app">

    <!--
			router-link:默认会被渲染成一个<a>标签,to属性为指定链接
			router-view:用于渲染路由匹配到的组件
		-->
		<router-link to="/home">首页</router-link>
		<router-link to="/login">登录</router-link>

    <router-view/>
  </div>
</template>

<style>

</style>
上面使用 <router-link> 配置了两个链接,分别跳转到 首页 和 登录 页面。
<router-view> 相当于占位符,路由匹配到的组件,会显示在 <router-view> 中。
运行效果:
当点击首页和关于,会跳转到指定的页面,并且地址栏也是发生变化:(地址栏中的# 只是路由模式的问题,后面在讲解)

17.3 vue-router使用细节
1 router-link标签
<router-link> 标签默认会被渲染被 <a> 标签,如果想渲染为其他标签,可以通过 tag 属性指定。
例如指定为 span 标签:
html
<router-link to="/home" tag="span">首页</router-link>
<router-link to="/login" tag="span">关于</router-link>
你也可以在上面添加 class 的 css 样式,都可以。
<router-link> 还有一个 replace 属性,这个表示点击链接后跳转到指定的页面后,前面那个页面的历史记录会被覆盖掉,无法通过浏览器的 后退 功能返回到上一个页面。
html
<router-link replace to="/home">首页</router-link>2 路由redirect重定向的使用
在上面实现的功能,点击首页按钮显示首页组件,点击登录按钮显示登录组件。但是当第一次进入到页面的时候,访问的是根路径,没有匹配到路由,则不会显示任何组件。
当然我们可以在路由中配置一个根路由,指向首页:
json
{ path: '/', component: HomePage }但是这样会多个路径跳转到首页,很不统一。所以我们可以在匹配到根路径的时候,重定向到首页。
js
// 2.配置页面路由
const routes = [
    {
        path: '/',
        redirect: '/home'  // 重定向到首页
    },
    {
        path: "/home",
        name: "home",
        component: HomePage,
    },
    {
        path: "/login",
        name: "login",
        component: () => import("@/pages/LoginPage.vue"),
    },
];
可以在路由配置中,添加 / 的路由,使用 redirect 属性,重定向到 /home 。
3 选中的路由的高亮显示
在上面实现的功能里,如果在点击 首页 链接的时候,首页 链接高亮显示,点击 登录 链接, 登录 链接高亮显示,那么该如何实现呢?
通过使用浏览器开发者工具,审查页面元素可以发现,点击 首页 链接以后,首页链接会添加 .router-link-active 的 css 样式类,点击 登录 链接的时候,登录链接会添加 .router-link-active 的 css 样式类,那么我们可以定义一个 .router-link-active 样式类,在其中定义样式即可。
例如:
css
<style scoped>
.router-link-active {
  color: red;
  font-weight: 800;
  text-decoration: underline;
  background-color: greenyellow;
}
</style>
这样就可以实现选中的路由高亮的功能了。显示如下:

其实 .router-link-active 的名称是可以自定义的。我们在创建 VueRouter 对象的时候,可以使用一个 linkActiveClass 属性来自定义这个名称。
js
const routes = [
    // ...
];

const router = new VueRouter({
    routes,
    linkActiveClass: 'my-active'  // 自定义激活的class名称
});

export default router;
我们指定了样式名称为 m-yactive,然后在定义样式的时候,定义样式名称为 my-active 的样式就可以了,这样可以实现使用第三方的样式了。
4 组件切换动画
实现动画很简单,和之前组件的切换动画是一样的:
- 将
<router-view>标签使用<transition>标签包裹
html
<transition mode="out-in">
    <router-view></router-view>
</transition>- 编写动画的样式
css
<style scoped>
.v-enter,
.v-leave-to {
    opacity: 0;
    transform: translateX(140px);
}

.v-enter-active,
.v-leave-active {
    transition: all 0.5s ease;
}
</style>
17.4 路由传参
1 使用query方式传递参数
传递参数
直接在点击的链接上拼接字符串即可:
html
<router-link to="/home?id=10&name=doubi">首页</router-link>如果要动态传递参数,参数来自组件中的 data ,可以这样写:
vue
<router-link :to="`/home?id=${id}&name=${name}`">首页</router-link>也可以使用对象的写法,给 :to 传递一个对象(推荐这种写法):
vue
<router-link :to="{
    path: '/home',
    query: {
        id: 13,
        name: 'doubi'
    }
}">首页</router-link>

<!-- 使用name也可以 -->
<RouterLink :to="{
    name: 'name',  // name就是定义路由时候的名称
    query: {
        id: 13,
        name: 'doubi'
    }
}">首页</RouterLink>
获取参数
在组件对象中,通过 $route.query 对象获取传递的参数。
vue
<template>
    <div class="home">
        <div>首页{{ $route.query.id }} --- {{ $route.query.name }}</div>
    </div>
</template>

<script>
export default {
    name: 'HomePage',
    // 生命周期函数
    created() {
        //通过query属性获取参数
        console.log(this.$route.query.id);
        console.log(this.$route.query.name);
    }
}
</script>注意,是$route 不是 $router 。
2 使用params方式传递路由参数
修改路由规则
修改 home 路由的匹配规则,使用占位符的方式,后面在传递参数的时候,home 后面的内容就会匹配成 id 的参数。
js
// 2.配置页面路由
const routes = [
    {
        path: '/',
        redirect: '/home'
    },
    {
        path: "/home/:id",  // 使用占位符
        name: "home",
        component: HomePage,
    },
    {
        path: "/login",
        name: "login",
        component: () => import("@/pages/LoginPage.vue"),
    },
];
如果想传递多个参数,可以在后面继续拼接,但是需要注意下面的 /home/:id/:name 是不会匹配路径 /home/13,因为后面没有name 的参数。只能匹配到类似 /home/13/doubi 的路径:
json
{
    path: "/home/:id/:name",
    name: "home",
    component: HomePage,
},
传递参数
/home/13/doubi 表示传递了 id 为 13,name 为 doubi。
html
<router-link to="/home/13/doubi">首页</router-link>如果要动态传递参数,参数来自组件中的 data ,可以这样写:
vue
<router-link :to="`/home/${id}/${name}`">首页</router-link>也可以使用对象的写法,给 :to 传递一个对象:
vue
<router-link :to="{
    name: 'home',
    params: {
        id: 13,
        name: 'doubi'
    }
}">首页</router-link>
注意:上面使用对象的写法,对于params的传参方式,只能用 name 不能用 path 。
获取参数
使用 $route.params 获取传递的参数。
vue
<template>
    <div class="home">
        <div>首页{{ $route.params.id }} --- {{ $route.params.name }}</div>
    </div>
</template>

<script>
export default {
    name: 'HomePage',
    // 生命周期函数
    created() {
        //通过query属性获取参数
        console.log(this.$route.params.id)
        console.log(this.$route.params.name)
    }
}
</script>
3 路由的props属性
在上面使用 query 和 params 传递参数的时候,都需要从 $route 对象中获取参数,不是很方便,我们可以使用路由的 props 属性来定义如何将路由参数传递给组件。这样做的好处是可以使组件更加解耦,因为它不需要直接从$route对象中获取参数。
使用的时候,主要有以下几种方式:
- 布尔模式;
- 函数模式;
- 对象模式;
举个栗子:
布尔模式:
当 props 被设置为true时,route.params 将被设置为组件的 props。
路由配置:
js
{
    path: "/home/:id/:name",
    name: "home",
    component: HomePage,
    props: true
}
组件中获取参数:
vue
<template>
    <div class="home">
        <div>首页{{ id }} --- {{ name }}</div>
    </div>
</template>

<script>
export default {
    name: 'HomePage',
    props: [ 'id', 'name'],
}
</script>注意这种只能获取到route.params 方式传递的参数。
函数模式
给 props 提供一个函数,该函数接收当前路由对象作为参数,并返回一个对象,这个对象将被用作组件的props。这提供了最大的灵活性,允许你根据路由信息动态地决定传递给组件的props。
js
{
    path: "/home",
    name: "home",
    component: HomePage,
    props($route) {
        // 获取 query 参数
        return { id: $route.query.id, name: $route.query.name }
        // 可以获取 params 参数
        // return { id: $route.query.id, name: $route.query.name }
    }
},
接收参数方式和上面的一样,使用 props 属性接收。
对象模式
可以在路由配置中配置对象类型的数据,然后作为 props 传递给组件。
路由配置:
通过 props 配置对象类型的数据 。
js
{
    path: "/home",
    name: "home",
    component: HomePage,
    props: { id: '13', name: 'doubi' }
}
接收参数方式和上面的一样,使用 props 属性接收。这些数据是静态数据,所以这种方式使用的比较少。
17.5 vue-router的跳转
页面跳转
在网页中,有两种页面跳转的方式:
使用
<a href="">标签和<router-link to="">标签的形式都叫标签跳转;上面<router-link>中,直接写/home就可以了,如果使用<a href="">,需要使用<a href="#/home">,后面路由模式再讲解。通过监听元素点击事件,通过
onclick事件处理,然后使用window.location.href的形式,叫做编程式导航;vue-router提供了编程式导航方式,可以通过代码实现导航的跳转:
下面来介绍如何使用代码进行路由跳转,因为正常在开发的时候,点击登录按钮,请求服务器登录,成功后,使用代码跳转到首页。
1 通过字符串指定路径
跳转到首页:
js
this.$router.push('/home');还可以使用 replace :
js
this.$router.replace('/home');注意,是$router 不是 $route 。
2 通过对象指定路径
js
this.$router.push({ path: '/home' })这里的将 path 放在一个对象中。这种方式也可以携带参数。
通过query方式传递参数:
js
this.$router.push({ path: '/home', query: { id: 13, name: 'doubi' }})
// 或者下面这种,但是推荐上面这种
this.$router.push({ path: '/home?id=13&name=doubi'})
params 方式直接写在路径中:
js
this.$router.push({ path: '/home/13/doubi' })3 命名的路由
通过路由名称来跳转:
js
this.$router.push({ name: 'home'})上面的 name 就是路由中的配置的 name 。
使用这种方式有一个比较方便的点是,如果是多级路由,只需要写名字就可以了。
json
{
    path: "/home/message",
    name: "message",  // 这里的name
    component: MessagePage,
},
直接写名字:
js
this.$router.push({ name: 'message'})4 页面后退
如果想实现页面的后退,使用 router 实现如下:
js
this.$router.go(-1);-1 表示后退一步,-2 则表示后退两步。
5 页面前进
如果想实现页面的前进,使用 router 实现如下:
js
this.$router.go(1);17.5 路由嵌套
一般在开发中会涉及到组件的嵌套,组件内部存在组件的切换,就会涉及路由的嵌套。
举个栗子:
在 App.vue 中会有一个 <router-view></router-view> , 用于登录页面 LoginPage.vue 和首页 HomePage.vue 页面的切换,而首页也会有组件的切换,点击菜单,切换局部的内容的部分,所以需要在 HomePage.vue 中也需要使用 <router-view></router-view> ,所以就涉及到 App.vue 和 HomePage.vue 中都使用 <router-view></router-view> 的路由嵌套。
下面我们来实现这个功能:
- 通过
/login路由跳转到LoginPage组件, 在LoginPage组件中有一个登录按钮,点击登录按钮跳转到HomePage.vue页面; - 在
HomePage.vue页面有三个按钮:退出、消息、设置, 点击退出按钮,跳转到LoginPage组件,点击消息按钮,HomePage.vue页面局部切换显示消息页面,点击设置按钮,HomePage.vue页面局部切换显示设置页面。
1 组件定义
App.vue
页面有一个 <router-view/> 用于登录页面 LoginPage.vue 和首页 HomePage.vue 页面的切换。
vue
<template>
  <div id="app">
    <router-view />
  </div>
</template>

<script>
export default {
  name: 'App'
}
</script>
LoginPage.vue
登录页面有一个登录按钮,点击登录按钮,通过代码实现路由跳转,跳转到 /home。
vue
<template>
    <div class="login">
        <div>登录</div>

        <div>
            <button @click="doLogin">登录</button>
        </div>
    </div>
</template>
<script>
export default {
    name: 'LoginPage',
    methods: {
        doLogin: function () {
            this.$router.push({ path: '/home' })
        }
    },
}
</script>
HomePage.vue
首页有三个按钮,退出、消息、设置,点击按钮,跳转到不同的页面。页面中也有一个 <router-view></router-view> 用于消息页面和设置组件的切换。
注意:消息和设置页面是在首页进行切换的,所以前面需要加 /home 。
vue
<template>
    <div class="home">
        <div>首页</div>
        <div>
            <button @click="logout">退出</button>
            <button @click="message">消息</button>
            <button @click="setting">设置</button>
        </div>

        <router-view></router-view>
    </div>
</template>

<script>
export default {
    name: 'HomePage',
    methods: {
        logout: function () {
            this.$router.push({ path: '/login' })
        },
        message: function () {
            this.$router.push({ path: '/home/message' })
        },
        setting: function () {
            this.$router.push({ path: '/home/setting' })
        },
    },
}
</script>
MessagePage.vue
vue
<template>
    <div class="login">
        <div>消息</div>
    </div>
</template>
<script>
export default {
    name: 'MessagePage',
}
</script>
SettingPage.vue
vue
<template>
    <div class="login">
        <div>设置</div>
    </div>
</template>
<script>
export default {
    name: 'SettingPage',
}
</script>
2 路由配置
js
import Vue from "vue";
import VueRouter from "vue-router";
// 1.引入页面组件
import HomePage from "@/pages/HomePage.vue";

Vue.use(VueRouter);

// 2.配置页面路由
const routes = [
    {
        path: "/home",
        name: "home",
        component: HomePage,
        children: [   // 子页面配置
            { path: 'message', component: () => import('@/pages/MessagePage.vue') },
            { path: 'setting', component: () => import('@/pages/SettingPage.vue') }
        ]
    },
    {
        path: "/login",
        name: "login",
        component: () => import("@/pages/LoginPage.vue"),
    },
];

const router = new VueRouter({
    routes,
});

export default router;
在配置路由的时候需要注意:
MessagePage.vue和SettingPage.vue是在HomePage页面的<router-view></router-view>中切换的,属于HomePage组件的子组件,所以路由需要配置在path: "/home"的children中。子路由的路径前面不要带
/,否则会从根路径来匹配。
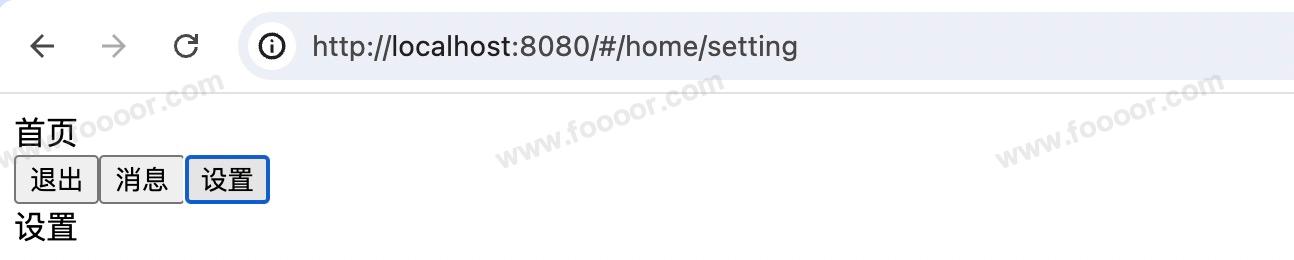
运行项目,访问 http://localhost:8080/#/login ,然后点击登录,跳转到 ome页面,然后点击设置按钮,显示效果:
17.6 缓存路由组件
<keep-alive> 是一个内置的抽象组件,它主要用于保持组件状态或避免重新渲染。当我们在 Vue 应用中进行路由跳转时,默认情况下,离开的组件会被销毁,再次进入时需要重新渲染。
这样在某些情况下会出问题,例如在一个组件输入了内容还没有保存就切换到另一个组件了,再切换回来导致输入的内容消失了。所以我们可以使用 <keep-alive> 保留组件的状态或避免重新渲染。
1 keep-alive
举个栗子:
编写 HomePage.vue 然后在其中进行 MessagePage.vue 和 SettingPage.vue 的切换:
vue
<template>
    <div class="home">
        <div>首页</div>
        <div>
            <router-link to="/home/message">消息</router-link>
            <router-link to="/home/setting">设置</router-link>
        </div>

        <keep-alive>
            <router-view></router-view>
        </keep-alive>
    </div>
</template>

<script>
export default {
    name: 'HomePage',
}
</script>
MessagePage.vue
vue
<template>
    <div>
        <div>消息</div>
        <input type="text" />
    </div>
</template>
<script>
export default {
    name: 'MessagePage',
    beforeDestroy() {
        console.log('准备销毁MessagePage')
    }
}
</script>
这样在切换 MessagePage.vue 和 SettingPage.vue 的时候, MessagePage.vue 页面输入的内容并不会丢失。
上面使用 <keep-alive> 将 <router-view></router-view> 包裹,那么 MessagePage.vue 和 SettingPage.vue 都不会销毁。
如果只想 MessagePage.vue 在切换的时候不会销毁,还可以通过指定组件名称,来指定不销毁的组件:
vue
<!-- 缓存一个组件 -->
<keep-alive include="MessagePage">
    <router-view></router-view>
</keep-alive>

<!-- 缓存多个组件 -->
<keep-alive :include="['MessagePage', 'SettingPage']">
    <router-view></router-view>
</keep-alive>
2 新的生命周期函数
在上面已经可以将组件缓存了,但是又可能引出一个新的问题。
例如,我们在组件的 mounted 声明周期函数中启动了一个定时器,在 beforeDestroy 生命周期中销毁这个定时器,但是因为使用了 <keep-alive> ,导致不会销毁组件,那么也不会调用 beforeDestroy函数,所以看不到组件的时候,定时器也是在不停的执行。
针对这个问题,引入了两个新的生命周期函数:
vue
<template>
    <div class="login">
        <div>消息</div>
        <input type="text" />
    </div>
</template>
<script>
export default {
    name: 'MessagePage',
    activated() {
        console.log('组件处于活动状态')
    },
    deactivated() {
        console.log('组件处于非活动状态')
    },
}
</script>
activated 和 deactivated 是 Vue Router 特有的导航守卫(navigation guards),它们专门用于 <keep-alive> 包裹的组件中。这些守卫不是 Vue 核心功能的一部分,而是 Vue Router 提供的,用于处理组件的激活和停用状态,所以上面提到的问题,可以使用这两个生命周期回调来处理。
17.7 路由守卫
路由守卫(也称为导航守卫)是在路由跳转过程中触发的钩子函数,它们允许开发者在路由跳转前后执行特定的逻辑,如权限验证、页面跳转拦截、组件数据预加载等。
例如用户点击了某个链接,这个链接的功能需要登录,那么就给用户跳转到登录页面。
Vue2 中的路由守卫主要分为三大类:全局守卫、路由独享守卫和组件内守卫。下面分别介绍这三类守卫。
1 全局守卫
全局守卫作用于整个应用,当路由发生变化时,这些守卫都会被触发。全局守卫主要包括三个回调钩子:
- beforeEach
- beforeResolve
- afterEach
我们可以在项目的路由文件 src/router/index.js 中进行配置。
全局前置守卫beforeEach
这个钩子会在每次路由导航之前触发。可以用于进行用户认证、权限检查等操作。这个是最常用的。
js
/* eslint-disable */
import Vue from "vue";
import VueRouter from "vue-router";
import HomePage from "@/pages/HomePage.vue";

Vue.use(VueRouter);

const routes = [
    {
        path: "/home",
        name: "home",
        component: HomePage,
        meta: { requiresAuth: true},  // 配置meta,其中的属性可以自定义
    },
    {
        path: "/login",
        name: "login",
        component: () => import("@/pages/LoginPage.vue"),
    },
];

const router = new VueRouter({
    routes,
});

/**
 * 前置路由守卫
 */
router.beforeEach((to, from, next) => {
    // 进行一些操作,比如检查用户是否已登录
    if (to.meta.requiresAuth && !isUserLoggedIn()) {
        console.log('跳转到登录');
        next({ path: '/login' }) // 重定向到登录页
    } else {
        // 调用 next() 方法来放行,否则路由不会跳转
        next();
    }
})

function isUserLoggedIn() {
    // 根据实际情况判断是否登录,可以从localStorage或Vuex中获取登录信息
    return false;
}

export default router;
上面先读取了 to.meta.requiresAuth 判断这个功能是否需要登录,如果这个路由是需要登录的,就使用 isUserLoggedIn 判断是否登录了,这个都是自定义的。
我们可以在路由中配置一下 meta.requiresAuth,meta 是路由对象的属性,我们可以在其中存储数据,然后在路由守卫中获取 meta 中的数据,然后进行判断。
这样在跳转到 /home ,在 router.beforeEach 中验证 to.meta.requiresAuth 就是需要登录了。
全局解析守卫beforeResolve
这个钩子在 beforeEach 和组件内守卫被解析之后,且在导航被确认之前执行。它可以用于异步数据获取等操作。
这个回调不常用,用不到就不用配置。
javascript
router.beforeResolve((to, from, next) => {
  // 在导航被确认之前执行一些操作
  next()
})
全局后置守卫afterEach
这个钩子在路由跳转完成后调用。可以用于进行一些收尾工作,比如停止加载动画等。该守卫没有 next 方法,因为路由跳转已经完成。
这个回调也用的不多,但是如果想要跳转完成,根据页面修改浏览器标签的 title,那么可以使用这种方式。
javascript
router.afterEach((to, from) => {
  // 在导航完成后执行一些操作
  document.title = to.meta.title || '逗比笔记'
})
同样,也需要在路由中的 meta 中配置 title :
vue
{
    path: "/home",
    name: "home",
    component: HomePage,
    meta: {requiresAuth: true, title: '首页'},
},
2 路由独享守卫
路由独享守卫只作用于特定的路由实例,不像全局守卫那样作用于所有路由。
所以需要配置在指定的路由中,使用 beforeEnter, 如下:
js
/* eslint-disable */
import Vue from "vue";
import VueRouter from "vue-router";
// 1.引入页面组件
import HomePage from "@/pages/HomePage.vue";

Vue.use(VueRouter);

// 2.配置页面路由
const routes = [
    {
        path: "/home",
        name: "home",
        component: HomePage,
        meta: { requiresAuth: true, title: '首页' },
        beforeEnter: (to, from, next) => {  // 路由独享守卫
            console.log('路由独享守卫');
            // 逻辑处理...
            next();
        }
    },
    {
        path: "/login",
        name: "login",
        meta: { title: '登录' },
        component: () => import("@/pages/LoginPage.vue"),
    },
];

const router = new VueRouter({
    routes,
});

export default router;
路由独享守卫只有前置没有后置守卫。
3 组件内守卫
组件内守卫是定义在组件内部的守卫,它们只在当前组件的路由发生变化时触发。
其中还包含了3个回调函数。需要注意,只有通过路由规则进入组件,回调才会被调用,通过标签引入该组件,不会触发调用。
- beforeRouteEnter:在路由进入之前调用。此钩子无法访问
this,因为此时组件实例还没有被创建。 - beforeRouteUpdate:在当前路由改变时被调用。当使用同一个组件实例渲染不同的路由时,该钩子会被调用。
- beforeRouteLeave:在导航离开组件的路由时调用。可以用来阻止导航。
举个栗子:
vue
<template>
    <div class="home">
        <div>首页</div>
    </div>
</template>

<script>
export default {
    name: 'HomePage',
    beforeRouteEnter(to, from, next) {
        // 组件实例被创建之前调用
        next(vm => {
            // 通过 vm 访问组件实例
        })
    },
    beforeRouteUpdate(to, from, next) {
        // 路由参数变化时被调用
        next()
    },
    beforeRouteLeave(to, from, next) {
        // 在离开该路由之前执行一些操作
        const answer = window.confirm('确定要离开吗?')
        if (answer) {
            next()
        } else {
            next(false)
        }
    }
}
</script>
17.8 路由模式
Vue2 中的路由模式主要分为两种:hash 模式和 history 模式。这两种模式在单页面应用(SPA)中用于管理页面的路由和组件的展示。
1 Hash模式
特点:
- URL 中带有
#符号,例如http://localhost:8080/#/home。 #及其后面的字符称为hash,hash的变化不会导致浏览器向服务器发送请求,因此页面不会重新加载。- 路由的切换实际上是通过监听 URL 的 hash 值变化来实现的,当 hash 值变化时,前端会根据这个变化来渲染对应的组件。
优点:
- 兼容性好,所有浏览器都支持 hash 路由。
- 无需服务器端配置。
缺点:
- URL 看起来不够美观,带有
#符号。
2 History模式
特点:
- URL 中不包含
#符号,例如http://localhost:8080/home。 - 路由的切换是通过 HTML5 History API 实现的,这种方式可以实现 URL 的无刷新跳转。
- 浏览器地址栏中的 URL 会随着路由的切换而变化,但页面不会重新加载。
优点:
- URL 看起来更加美观,和传统的网页地址一样。
- 用户体验更好,因为用户不会看到 URL 中的
#符号。
缺点:
- 兼容性相对较差,一些旧的浏览器可能不支持 HTML5 History API。
- 应用打包部署到服务后,需要服务器端的支持,否则刷新页面会出现 404 错误。可以在 Nginx 中进行配置
nginx
location / {
    root   /usr/share/nginx/html;
    index  index.html index.htm;
    try_files  $uri $uri/ /index.html;  # 需要添加如下配置
}
3 配置方式
在 Vue2 中,使用 vue-router 时可以通过在创建 VueRouter 实例时设置 mode 属性来指定路由模式。例如:
javascript
const router = new VueRouter({
  mode: 'history', // 设置为 history 模式
  routes: [
    // 路由配置...
  ]
});
如果不设置 mode 属性,则默认使用 hash 模式。
内容未完......