# Vue3教程 - 19 插槽
和 Vue2 中的用法基本一样。
Vue 中的插槽(Slot)是一种组件间通信的技术,它允许父组件向子组件中插入 HTML 结构或组件。
使用场景,在不同的父组件中使用某个子组件的时候,想要动态的渲染子组件的内容。子组件的部分内容可以从父组件中“传递”到子组件进行显示。
# 19.1 插槽是什么
下面看一个例子
写一个子组件:ChildCom.vue
<template>
<div>
<div>我是子组件</div>
</div>
</template>
<!-- setup -->
<script lang="ts" setup>
</script>
2
3
4
5
6
7
8
9
10
写一个父组件:HomePage.vue
。
在父组件中使用子组件 ChildCom
。
<template>
<div>
<div>我是父组件</div>
<ChildCom>
<p>测试一下,把内容写在这里,看是否能否显示</p>
</ChildCom>
</div>
</template>
<!-- setup -->
<script lang="ts" setup>
import ChildCom from '@/components/ChildCom.vue';
</script>
2
3
4
5
6
7
8
9
10
11
12
13
14
15
运行代码,效果如下:
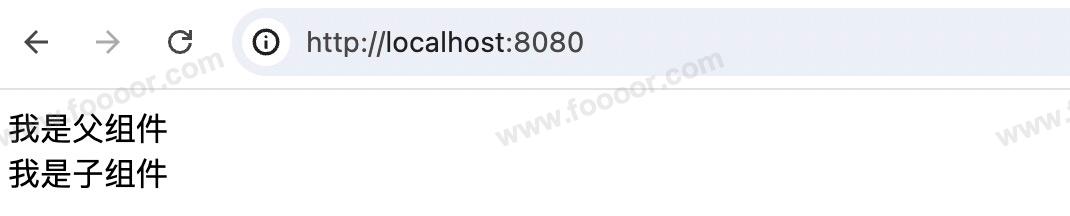
可以看到在父组件中,使用子组件的时候,在子组件标签中间添加的内容是看不见的。
那如果我想实现显示父标签中,子标签中间添加的内容,该怎么办?
修改子组件:ChildCom.vue
,添加一个 <slot></slot>
标签:
<template>
<div>
<div>我是子组件</div>
<slot></slot>
</div>
</template>
<!-- setup -->
<script lang="ts" setup>
</script>
2
3
4
5
6
7
8
9
10
11
在子组件中添加了一个 slot
插槽。那么在父组件中使用子组件的时候,子标签中的内容就回显示到子组件的 slot
插槽中。
运行代码,显示效果:
# 19.2 插槽的分类
Vue 中的插槽主要分为以下几种类型:
- 默认插槽(匿名插槽)
- 具名插槽
- 作用域插槽
# 1 默认插槽
在上面演示的时候,使用的就是默认插槽。
下面再举个例子。
例如在一个弹出框的子组件中,想要控制弹出框中按钮的文本,我们可能希望这个 <button>
内绝大多数情况下都渲染文本 确定
,但是有时候却希望渲染文本为提交
,那怎么实现呢?
我们可以将 确定
作为默认内容,我们可以将它放在 <slot>
标签内:
定义子组件:DialogCom.vue
<template>
<div>
<button type="submit">
<slot>确定</slot>
</button>
</div>
</template>
<!-- setup -->
<script lang="ts" setup>
</script>
2
3
4
5
6
7
8
9
10
11
12
现在当我在一个父级组件中使用子组件 <DialogCom>
,并且不提供任何插槽内容时:
<template>
<div>
<div>我是父组件</div>
<DialogCom></DialogCom>
</div>
</template>
<!-- setup -->
<script lang="ts" setup>
import DialogCom from '@/components/DialogCom.vue';
</script>
2
3
4
5
6
7
8
9
10
11
12
13
显示如下:
但是如果我们提供内容:
<DialogCom>
提交
</DialogCom>
2
3
则默认内容将会被父组件提供的内容覆盖:
# 2 具名插槽
有时候我们希望通过父组件向子组件传递多个结构和组件,将不同的内容渲染到不同的区域,这个时候就需要用到具名插槽了。
可以通过给 <slot>
标签添加 name
属性来定义具名插槽。父组件在填充内容时,需要使用 v-slot
指令(或简写为 #
)加上插槽名称来指定内容应该填充到哪个插槽中。
例如定义子组件:ChildCom.vue
:
<template>
<div>
<header>
<slot name="header"></slot>
</header>
<main>
<slot></slot> <!-- 默认插槽 -->
</main>
<footer>
<slot name="footer"></slot>
</footer>
</div>
</template>
<!-- setup -->
<script lang="ts" setup>
</script>
2
3
4
5
6
7
8
9
10
11
12
13
14
15
16
17
18
在子组件中定义了多个插槽,那么可以在父组件中根据插槽的名称传递。
父组件:HomePage.vue
<template>
<div>
<div>我是父组件</div>
<ChildCom>
<template v-slot:header>
<h1>这是头部内容</h1>
</template>
<p>这是默认插槽的内容</p>
<template v-slot:footer>
<p>这是底部内容</p>
</template>
</ChildCom>
</div>
</template>
<!-- setup -->
<script lang="ts" setup>
import ChildCom from '@/components/ChildCom.vue';
</script>
2
3
4
5
6
7
8
9
10
11
12
13
14
15
16
17
18
19
20
21
22
23
24
在使用具名插槽的时候,推荐使用 <template>
元素将内容包裹,然后使用 v-slot
指令指定插槽的名称。 <template>
标签本身不会被渲染成 DOM 元素,它仅仅是一个包裹元素,用于包含和指定插槽内容。如果使用 div
等元素,会额外多一层DOM。
运行结果:
子组件中,一个不带 name
的 <slot>
插槽,默认的名字是 default
。 所以父组件中也可以通过如下方式向默认插槽传递:
<template #default>
<p>这是默认插槽的内容</p>
</template>
2
3
具名插槽在书写的时候可以使用缩写,v-slot
可以用 #
来代替:
<template>
<div>
<div>我是父组件</div>
<ChildCom>
<template #header>
<h1>这是头部内容</h1>
</template>
<p>这是默认插槽的内容</p>
<template #footer>
<p>这是底部内容</p>
</template>
</ChildCom>
</div>
</template>
2
3
4
5
6
7
8
9
10
11
12
13
14
15
16
# 3 作用域插槽
这里主要解决的是父组件在向子组件插槽传递模板内容时,允许传递的模板访问子组件的数据。这样,父组件就可以根据这些数据来动态渲染内容。
举个栗子:
子组件定义作用域插槽
在子组件的模板中,通过 <slot>
标签的 v-bind
(或简写为 :
)绑定数据,这些数据就可以在父组件的插槽内容中使用了。
定义子组件:ChildCom.vue
<template>
<div>
<span>
<!-- 父组件就可以操作user了 -->
<slot :user="user"></slot>
</span>
</div>
</template>
<!-- setup -->
<script lang="ts" setup>
import { ref } from 'vue';
let user = ref({
username: "doubi",
age: 13
});
</script>
2
3
4
5
6
7
8
9
10
11
12
13
14
15
16
17
18
19
在上面的代码中,通过 v-bind
(简写为 :
)绑定数据到插槽,这样父组件就可以操作 user
数据了。
父组件使用作用域插槽
在父组件中,通过 <template>
元素和 v-slot
指令(或缩写为#
)来接收子组件传递的数据,并定义如何渲染这些数据。
<template>
<div>
<div>我是父组件</div>
<ChildCom>
<!-- 父组件可以操作插槽的数据 -->
<template v-slot:default="slotProps">
<p>{{ slotProps.user.username }}</p>
<p>{{ slotProps.user.age }}</p>
</template>
</ChildCom>
</div>
</template>
<!-- setup -->
<script lang="ts" setup>
import ChildCom from '@/components/ChildCom.vue';
</script>
2
3
4
5
6
7
8
9
10
11
12
13
14
15
16
17
18
19
20
- 上面例子,我们将包含插槽数据对象命名为
slotProps
,名称是自定义的,然后可以操作数据了。 - 因为子组件中插槽是没有名称的,所以这里使用
v-slot:default
是给默认插槽传递模板。
也可以使用简写方式给默认插槽传递:
<!-- 方式1 -->
<template v-slot="slotProps">
<p>{{ slotProps.user.username }}</p>
<p>{{ slotProps.user.age }}</p>
</template>
<!-- 方式2 -->
<template #default="slotProps">
<p>{{ slotProps.user.username }}</p>
<p>{{ slotProps.user.age }}</p>
</template>
2
3
4
5
6
7
8
9
10
11
通过作用域插槽,就可以在父组件中决定子组件的数据如何渲染,例如下面两次使用了 ChildCom
组件,使用的渲染方式不同:
<template>
<div>
<div>我是父组件</div>
<ChildCom>
<!-- 父组件可以操作插槽的数据 -->
<template v-slot:default="slotProps">
<p>{{ slotProps.user.username }}</p>
<p>{{ slotProps.user.age }}</p>
</template>
</ChildCom>
<ChildCom>
<template v-slot:default="slotProps">
<ul>
<li>{{ slotProps.user.username }}</li>
<li>{{ slotProps.user.age }}</li>
</ul>
</template>
</ChildCom>
</div>
</template>
<!-- setup -->
<script lang="ts" setup>
import ChildCom from '@/components/ChildCom.vue';
</script>
<style scoped>
p {
background-color: yellowgreen;
}
ul {
background-color: lightblue;
}
</style>
2
3
4
5
6
7
8
9
10
11
12
13
14
15
16
17
18
19
20
21
22
23
24
25
26
27
28
29
30
31
32
33
34
35
36
37
38
39
显示效果:
下面再看一下,如果是多个插槽的情况,子组件:
ChildCom.vue
:
<template>
<div>
<span>
<!-- 父组件就可以操作user了 -->
<slot name="header" :user="user"></slot>
<!-- 父组件就可以操作hobby了 -->
<slot name="footer" :hobby="hobby"></slot>
</span>
</div>
</template>
<!-- setup -->
<script lang="ts" setup>
import { ref } from 'vue';
let user = ref({
username: "doubi",
age: 13
});
let hobby = ref({
fruit: "apple",
color: "blue"
});
</script>
2
3
4
5
6
7
8
9
10
11
12
13
14
15
16
17
18
19
20
21
22
23
24
25
26
27
父组件:
<template>
<div>
<div>我是父组件</div>
<ChildCom>
<!-- 父组件可以操作插槽的数据 -->
<template #header="slotProps">
<p>{{ slotProps.user.username }}</p>
<p>{{ slotProps.user.age }}</p>
</template>
<template #footer="slotProps">
<p>{{ slotProps.hobby.fruit }}</p>
<p>{{ slotProps.hobby.color }}</p>
</template>
</ChildCom>
</div>
</template>
<!-- setup -->
<script lang="ts" setup>
import ChildCom from '@/components/ChildCom.vue';
</script>
2
3
4
5
6
7
8
9
10
11
12
13
14
15
16
17
18
19
20
21
22
23
24
25
← 18-路由 20-引入第三方组件 →