Appearance
SpringBoot3教程 - 20 自定义Starter
Starter 也就是场景启动器,通过 Starter 可以简化项目的依赖管理,在开发的时候,只需要引入指定的 Starter,而无需关心底层的依赖关系。同时 Starter 中可以包含配置信息和自动配置类,使得集成更加便捷,降低项目复杂性,提高开发效率。
而通过自定义 Starter ,我们可以将一些通用的功能或组件进行封装,可以在多个项目之间进行共享和复用,减少重复代码和配置。各个项目也可以有统一的配置标准,减少配置差异和错误,提高代码质量和一致性。
通过前面自动配置原理的学习,下面我们来介绍一下自定义 Starter 的实现。
20.1 自定义Starter说明
1 Starter模块说明
Starter 一般由两个模块构成:
xxx-autoconfigure模块,提供自动配置功能;xxx-starter模块,提供依赖管理功能,然后在 xxx-starter 模块引入xxx-autoconfigure模块。
查看官方的 starter,例如 spring-boot-starter :

可以看到其中没有任何的java代码,通过项目的pom.xml去查看依赖,跳进 spring-boot-starter 的pom.xml,可以看到最终依赖了spring-boot-autoconfigure 。
所以启动器只用来做依赖导入,另外专门来写一个自动配置模块,启动器依赖自动配置;使用 Starter 的人只需要引入启动器(Starter),启动器再自动导入自动配置模块。
2 Starter名称说明
编写 Starter 的名称,我们还是不要太随意,按照指定的格式,规范且专业:
SpringBoot 官方Starter的名称都是如下格式:
- 格式:
spring-boot-starter-模块名 - 举个栗子:
spring-boot-starter-web、spring-boot-starter-jdbc。
自定义 Starter 的名称一般使用如下格式:
- 格式:
模块-spring-boot-starter - 举个栗子:
mybatis-spring-boot-starter、jasypt-spring-boot-starter。
所以这里我们也按照这个格式。
下面开始创建项目。
20.2 创建项目
编写 Starter 需要编写 starter 模块和 autoconfigurer 模块,所以我们先新建一个空项目,然后在这个空的项目中新建两个模块。
创建空项目:
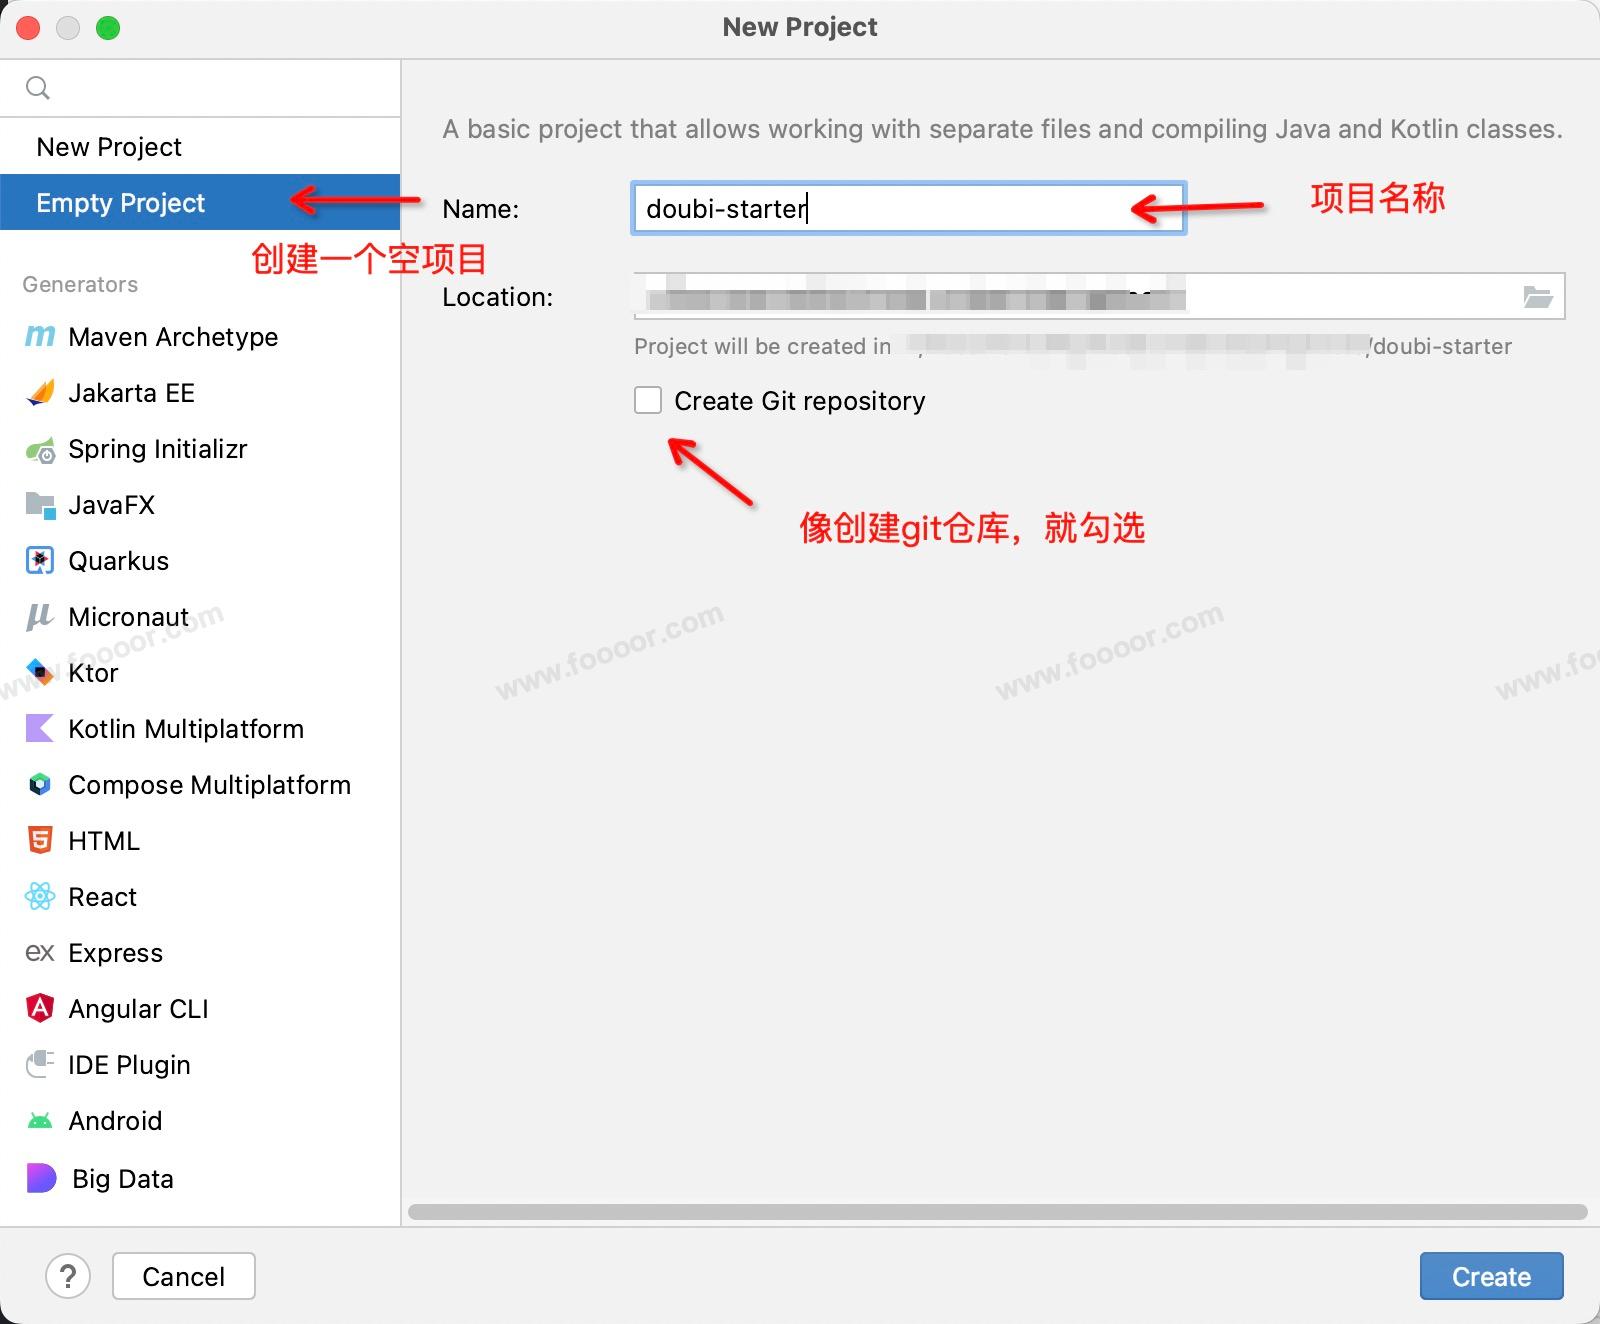
创建完成,然后再创建 starter 模块和 autoconfigurer 模块。
创建 starter 模块,右键项目 -> New -> Module:
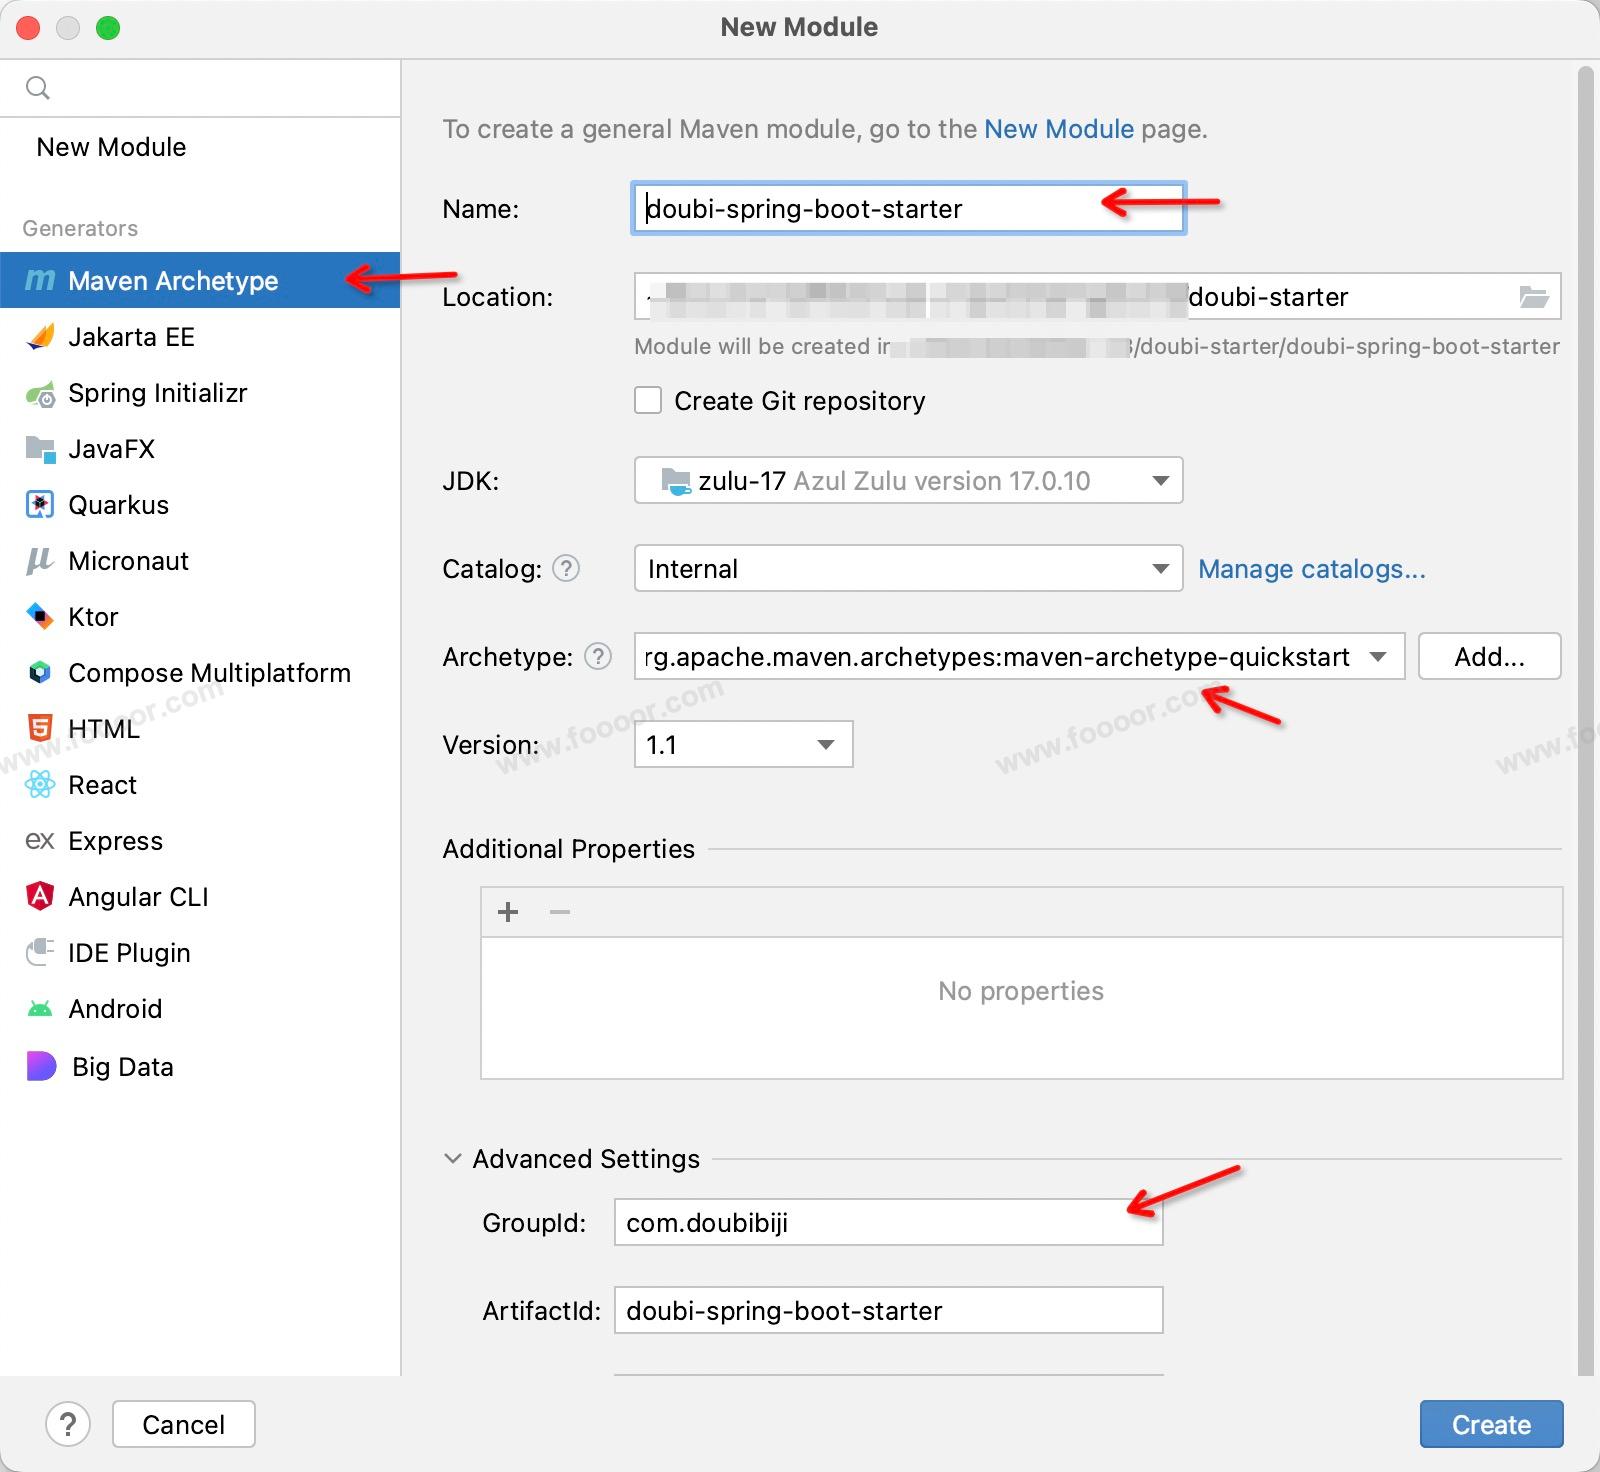
创建 autoconfigure 模块,右键项目 -> New -> Module:
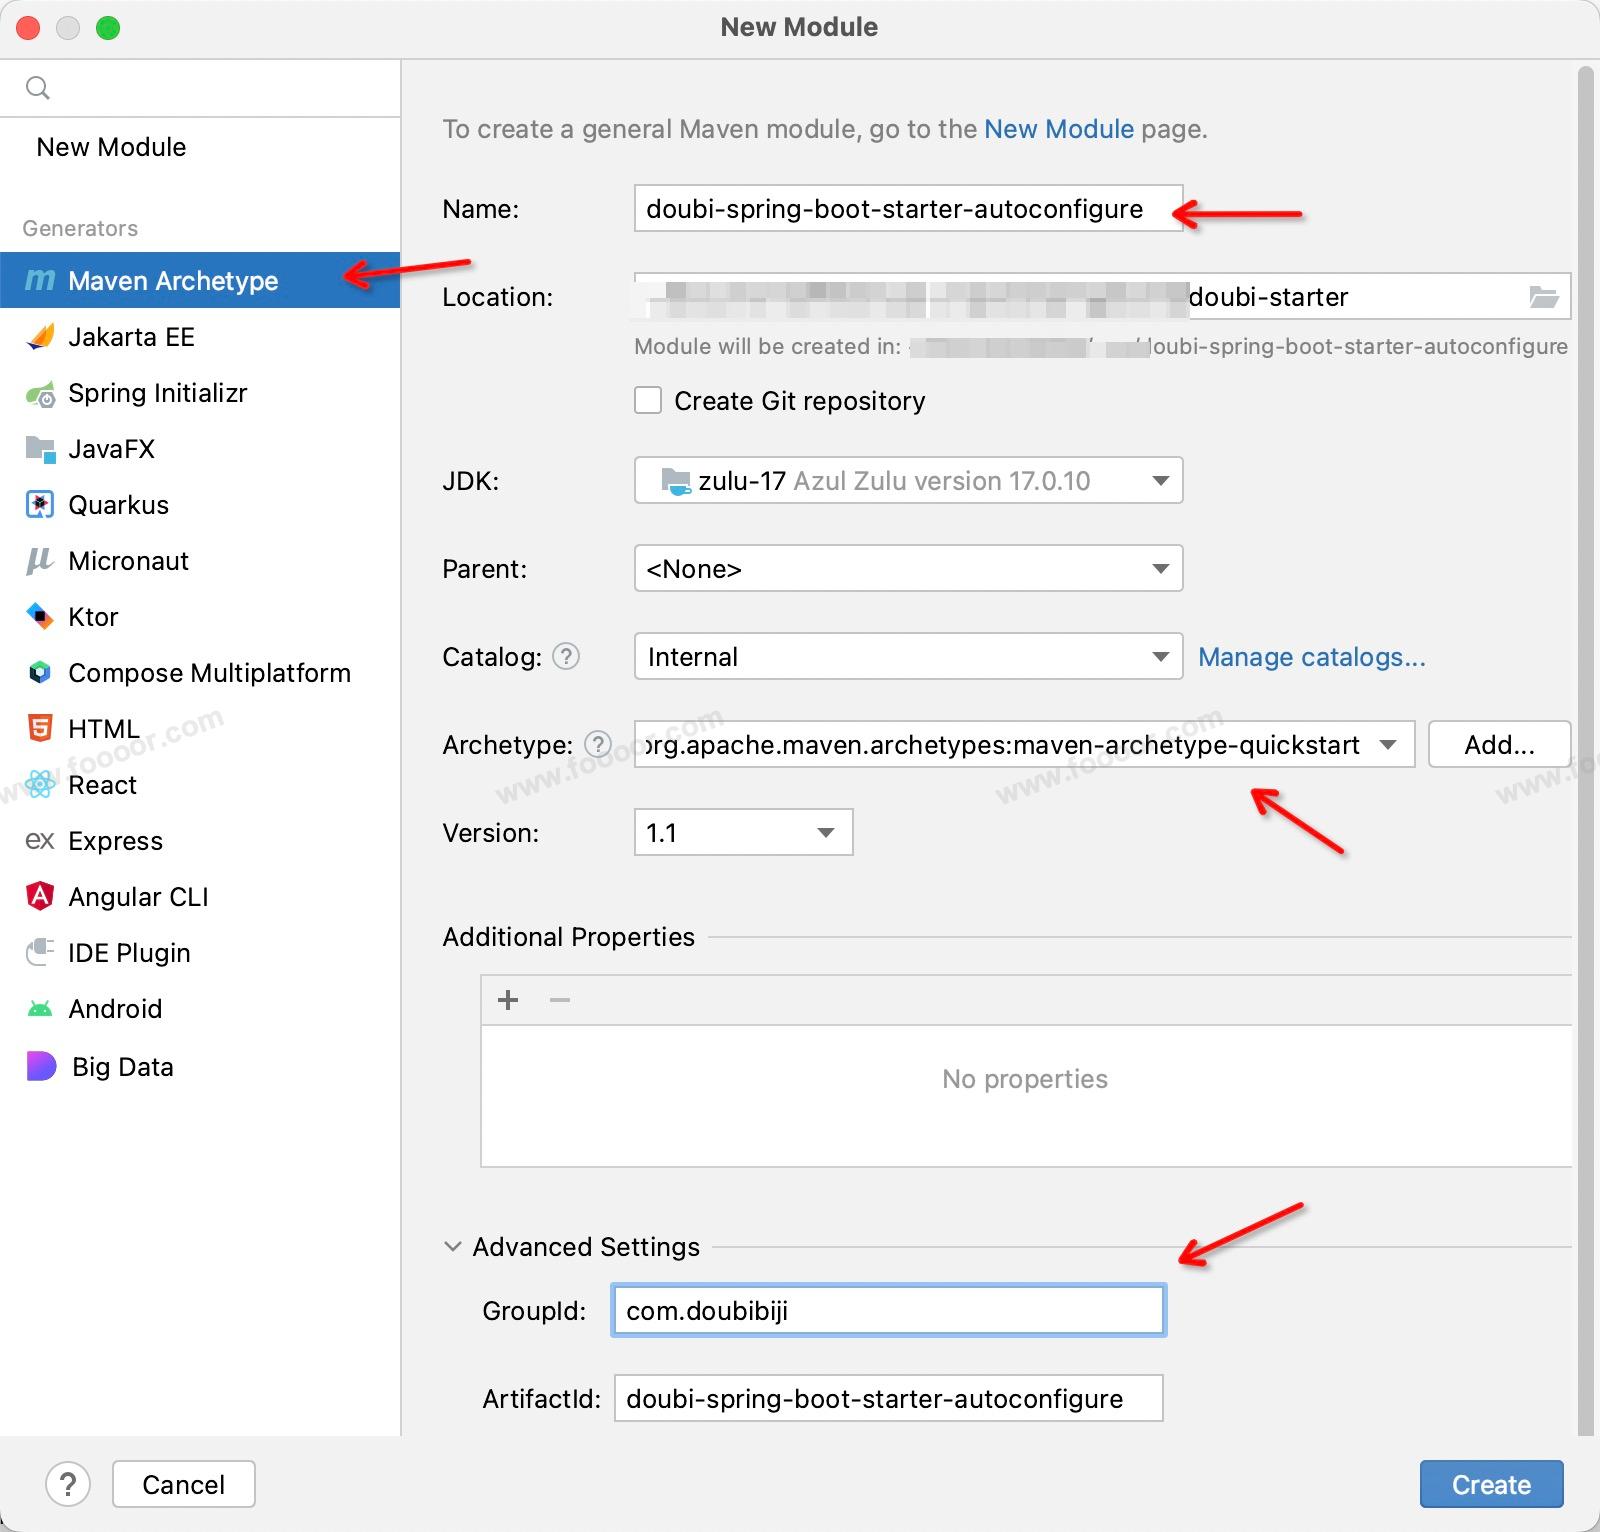
创建完成,将两个模块下没有用的东西(自动创建的类,和test包)删除,删除后如下:
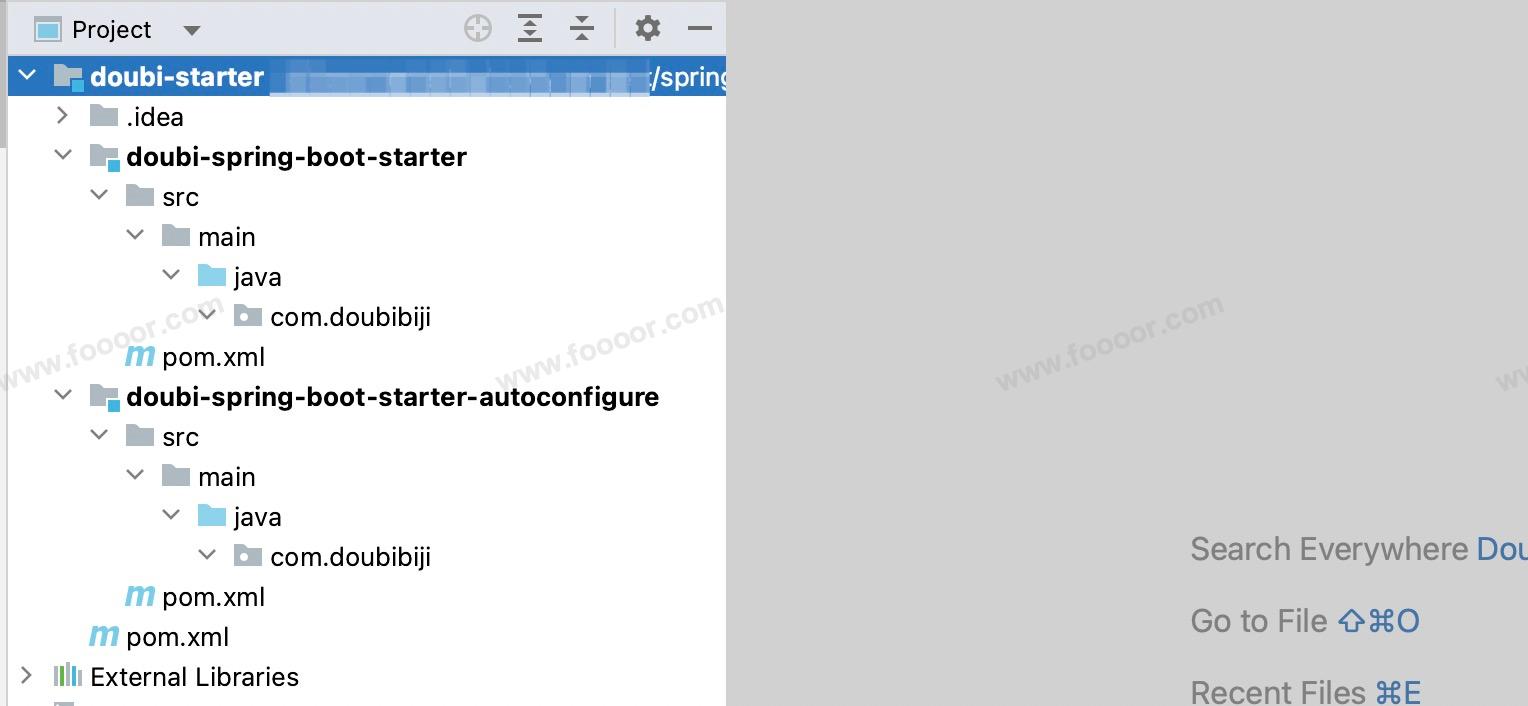
20.3 编写autoconfigure模块
在 autoconfigure 模块中提供的整个 Starter 的主要的功能,这里只是为了演示,提供的功能不重要,这里就简单编写一个 service,提供一个方法,拼接的一句话。
1 首先引入依赖
首先引入 SpringBoot 的依赖,这样才能实现自动注入的相关功能。其他的依赖,需要什么依赖引入什么依赖就可以了。
添加 maven-compiler-plugin 查看,否则打包报错。
xml
<project xmlns="http://maven.apache.org/POM/4.0.0" xmlns:xsi="http://www.w3.org/2001/XMLSchema-instance"
         xsi:schemaLocation="http://maven.apache.org/POM/4.0.0 http://maven.apache.org/xsd/maven-4.0.0.xsd">
    <modelVersion>4.0.0</modelVersion>

    <groupId>com.doubibiji</groupId>
    <artifactId>doubi-spring-boot-starter-autoconfigure</artifactId>
    <version>1.0-SNAPSHOT</version>
    <packaging>jar</packaging>

    <name>doubi-spring-boot-starter-autoconfigure</name>
    <url>http://maven.apache.org</url>

    <properties>
        <project.build.sourceEncoding>UTF-8</project.build.sourceEncoding>
    </properties>

    <dependencies>
        <dependency>
            <groupId>org.springframework.boot</groupId>
            <artifactId>spring-boot-starter</artifactId>
            <version>3.3.1</version>
        </dependency>

        <dependency>
            <groupId>org.projectlombok</groupId>
            <artifactId>lombok</artifactId>
            <version>1.18.32</version>
            <optional>true</optional>
        </dependency>
    </dependencies>

    <build>
        <plugins>
            <plugin>
                <groupId>org.apache.maven.plugins</groupId>
                <artifactId>maven-compiler-plugin</artifactId>
                <version>3.11.0</version>
                <configuration>
                    <source>17</source>
                    <target>17</target>
                </configuration>
            </plugin>
        </plugins>
    </build>

</project>
2 编写配置类
创建一个配置类,以后别的项目引入现在编写的这个starter,那么在项目的 application.yaml 中配置指定的属性,就可以注入到下面的配置类中:
java
package com.doubibiji.config;

import lombok.Data;
import org.springframework.boot.context.properties.ConfigurationProperties;


@Data
@ConfigurationProperties(prefix = "doubi")
public class DoubiProperties {

    // 属性是随意定义的,主要演示属性注入,在后面的service中使用
    private String prefix;
    private String suffix;

}
注意:上面的 @ConfigurationProperties 此时会报错,待会需要编写自动配置类,来引入这个配置类。
3 编写Service
首先编写一个 Service, 提供一个方法。
将配置类注入到 service 中,读取配置类的属性,拼接字符串返回,如此而已。
java
package com.doubibiji.service;

import com.doubibiji.config.DoubiProperties;
import org.springframework.beans.factory.annotation.Autowired;

public class DoubiService {

    @Autowired
    private DoubiProperties doubiProperties;

    /**
     * 提供的方法
     */
    public String sayHello(String name) {
        return doubiProperties.getPrefix() + " " + name + " " +doubiProperties.getSuffix();
    }
}
注意,这里 service 没有使用 @service 注解,后面在自动配置类中进行注册,否则别的项目集成这个自定义 Starter,可能扫描不到这个 Starter 中的组件。
4 编写自动配置类
编写一个自动配置类,对 Bean 进行注册。
使用 @AutoConfiguration 注解,并使用 @EnableConfigurationProperties 注解将 DoubiProperties 配置类注入到 Spring IOC 容器。添加完 @EnableConfigurationProperties 注解, DoubiProperties 配置类的 @ConfigurationProperties 注解才不会报错。
java
package com.doubibiji.config;

import com.doubibiji.service.DoubiService;
import org.springframework.boot.autoconfigure.AutoConfiguration;
import org.springframework.boot.context.properties.EnableConfigurationProperties;
import org.springframework.context.annotation.Bean;

@AutoConfiguration
@EnableConfigurationProperties(DoubiProperties.class)
public class DoubiAutoConfiguration {

    @Bean
    public DoubiService doubiService() {
        return new DoubiService();
    }

}
5 编写imports文件
创建 resources 目录,在其下创建 META-INF 文件夹,在 META-INF 文件夹下创建 spring 文件夹,在 spring 文件夹下创建 org.springframework.boot.autoconfigure.AutoConfiguration.imports 文件,然后在文件中添加自动配置类 DoubiAutoConfiguration 的全类名。
java
com.doubibiji.config.DoubiAutoConfiguration这个文件是 spring-boot-starter-autoconfigure 模块负责解析的,SpringBoot 项目都会引入 spring-boot-starter-autoconfigure 的依赖,所以不用我们来解析。
6 编译安装
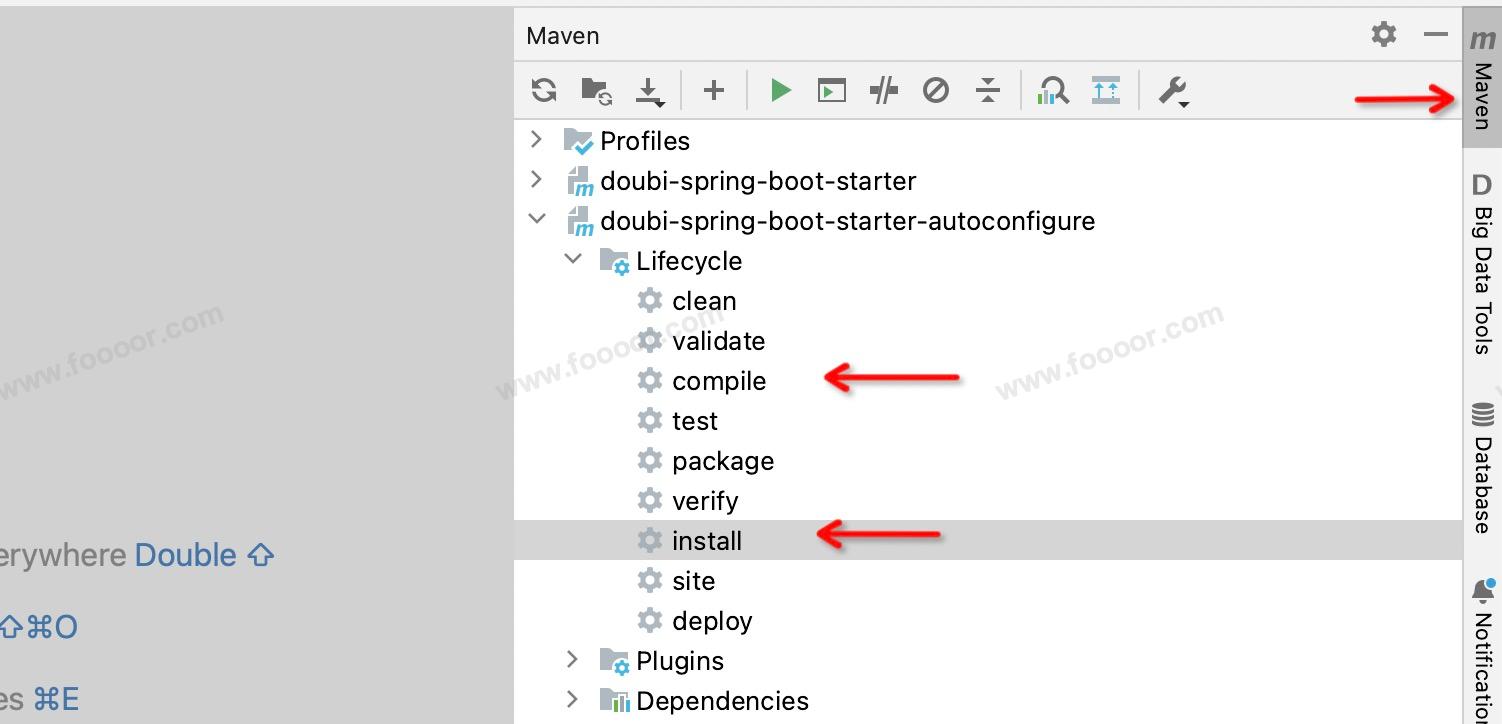
autoconfigure 模块已经编写完了,可以使用 Maven,分别执行一下 compile 和 install,编译和安装到 Maven 仓库,这样在别的模块可以找到。
20.4 编写starter模块
autoconfigure 模块已经编写完成了,下面来编写 starter 模块,starter 模块主要是管理依赖的,所以没有代码。
只需要在 starter 模块的 pom.xml 文件中添加依赖即可。首先就是添加 autoconfigure 模块的依赖,另外需要将 autoconfigure 模块的依赖全部添加到 starter 模块中,因为在使用这个自定义的 Starter 的时候,只需要引入 starter 模块,而在使用 Starter 的时候如果想替换排除 Starter 中的依赖,这样做就比较方便。
pom.xml
xml
<project xmlns="http://maven.apache.org/POM/4.0.0" xmlns:xsi="http://www.w3.org/2001/XMLSchema-instance"
         xsi:schemaLocation="http://maven.apache.org/POM/4.0.0 http://maven.apache.org/xsd/maven-4.0.0.xsd">
    <modelVersion>4.0.0</modelVersion>

    <groupId>com.doubibiji</groupId>
    <artifactId>doubi-spring-boot-starter</artifactId>
    <version>1.0-SNAPSHOT</version>
    <packaging>jar</packaging>

    <name>doubi-spring-boot-starter</name>
    <url>http://maven.apache.org</url>

    <properties>
        <project.build.sourceEncoding>UTF-8</project.build.sourceEncoding>
    </properties>

    <dependencies>
        <dependency>
            <groupId>com.doubibiji</groupId>
            <artifactId>doubi-spring-boot-starter-autoconfigure</artifactId>
            <version>1.0-SNAPSHOT</version>
        </dependency>

        <dependency>
            <groupId>org.projectlombok</groupId>
            <artifactId>lombok</artifactId>
            <version>1.18.32</version>
            <optional>true</optional>
        </dependency>
    </dependencies>

    <build>
        <plugins>
            <plugin>
                <groupId>org.apache.maven.plugins</groupId>
                <artifactId>maven-compiler-plugin</artifactId>
                <version>3.11.0</version>
                <configuration>
                    <source>17</source>
                    <target>17</target>
                </configuration>
            </plugin>
        </plugins>
    </build>

</project>
然后使用 Maven进行 compile 和 install 一下、
20.5 使用自定义starter
新建一个 SpringBoot 模块,然后在模块中引入自定义的 Starter,看是否能直接使用 Starter 中的 service,并调用其中的方法。
1 新建测试的SpringBoot模块
新建一个 SpringBoot 模块,直接使用 Spring Initializr 创建就好了。
2 引入自定义Starter
首先就是在 pom.xml 中引入自定义的 Starter 依赖。
xml
 <dependency>
    <groupId>com.doubibiji</groupId>
    <artifactId>doubi-spring-boot-starter</artifactId>
    <version>1.0-SNAPSHOT</version>
</dependency>
3 添加配置
上面自定义 Starter 中需要读取一个配置,所以在 application.yaml 中添加如下配置:
yaml
doubi:
  prefix: Hello
  suffix: Nice to meet you!
4 测试
这里直接在测试类中测试,看能否注入 Starter 中的 service,并调用其中的方法即可。
java
package com.doubibiji.doubistartertest;

import com.doubibiji.service.DoubiService;
import org.junit.jupiter.api.Test;
import org.springframework.beans.factory.annotation.Autowired;
import org.springframework.boot.test.context.SpringBootTest;

@SpringBootTest
class DoubiStarterTestApplicationTests {

    @Autowired
    private DoubiService doubiService;

    @Test
    void contextLoads() {

        String str = doubiService.sayHello("Doubi");
        System.out.println(str);
    }

}
执行结果:
Hello Doubi Nice to meet you!20.6 项目结构
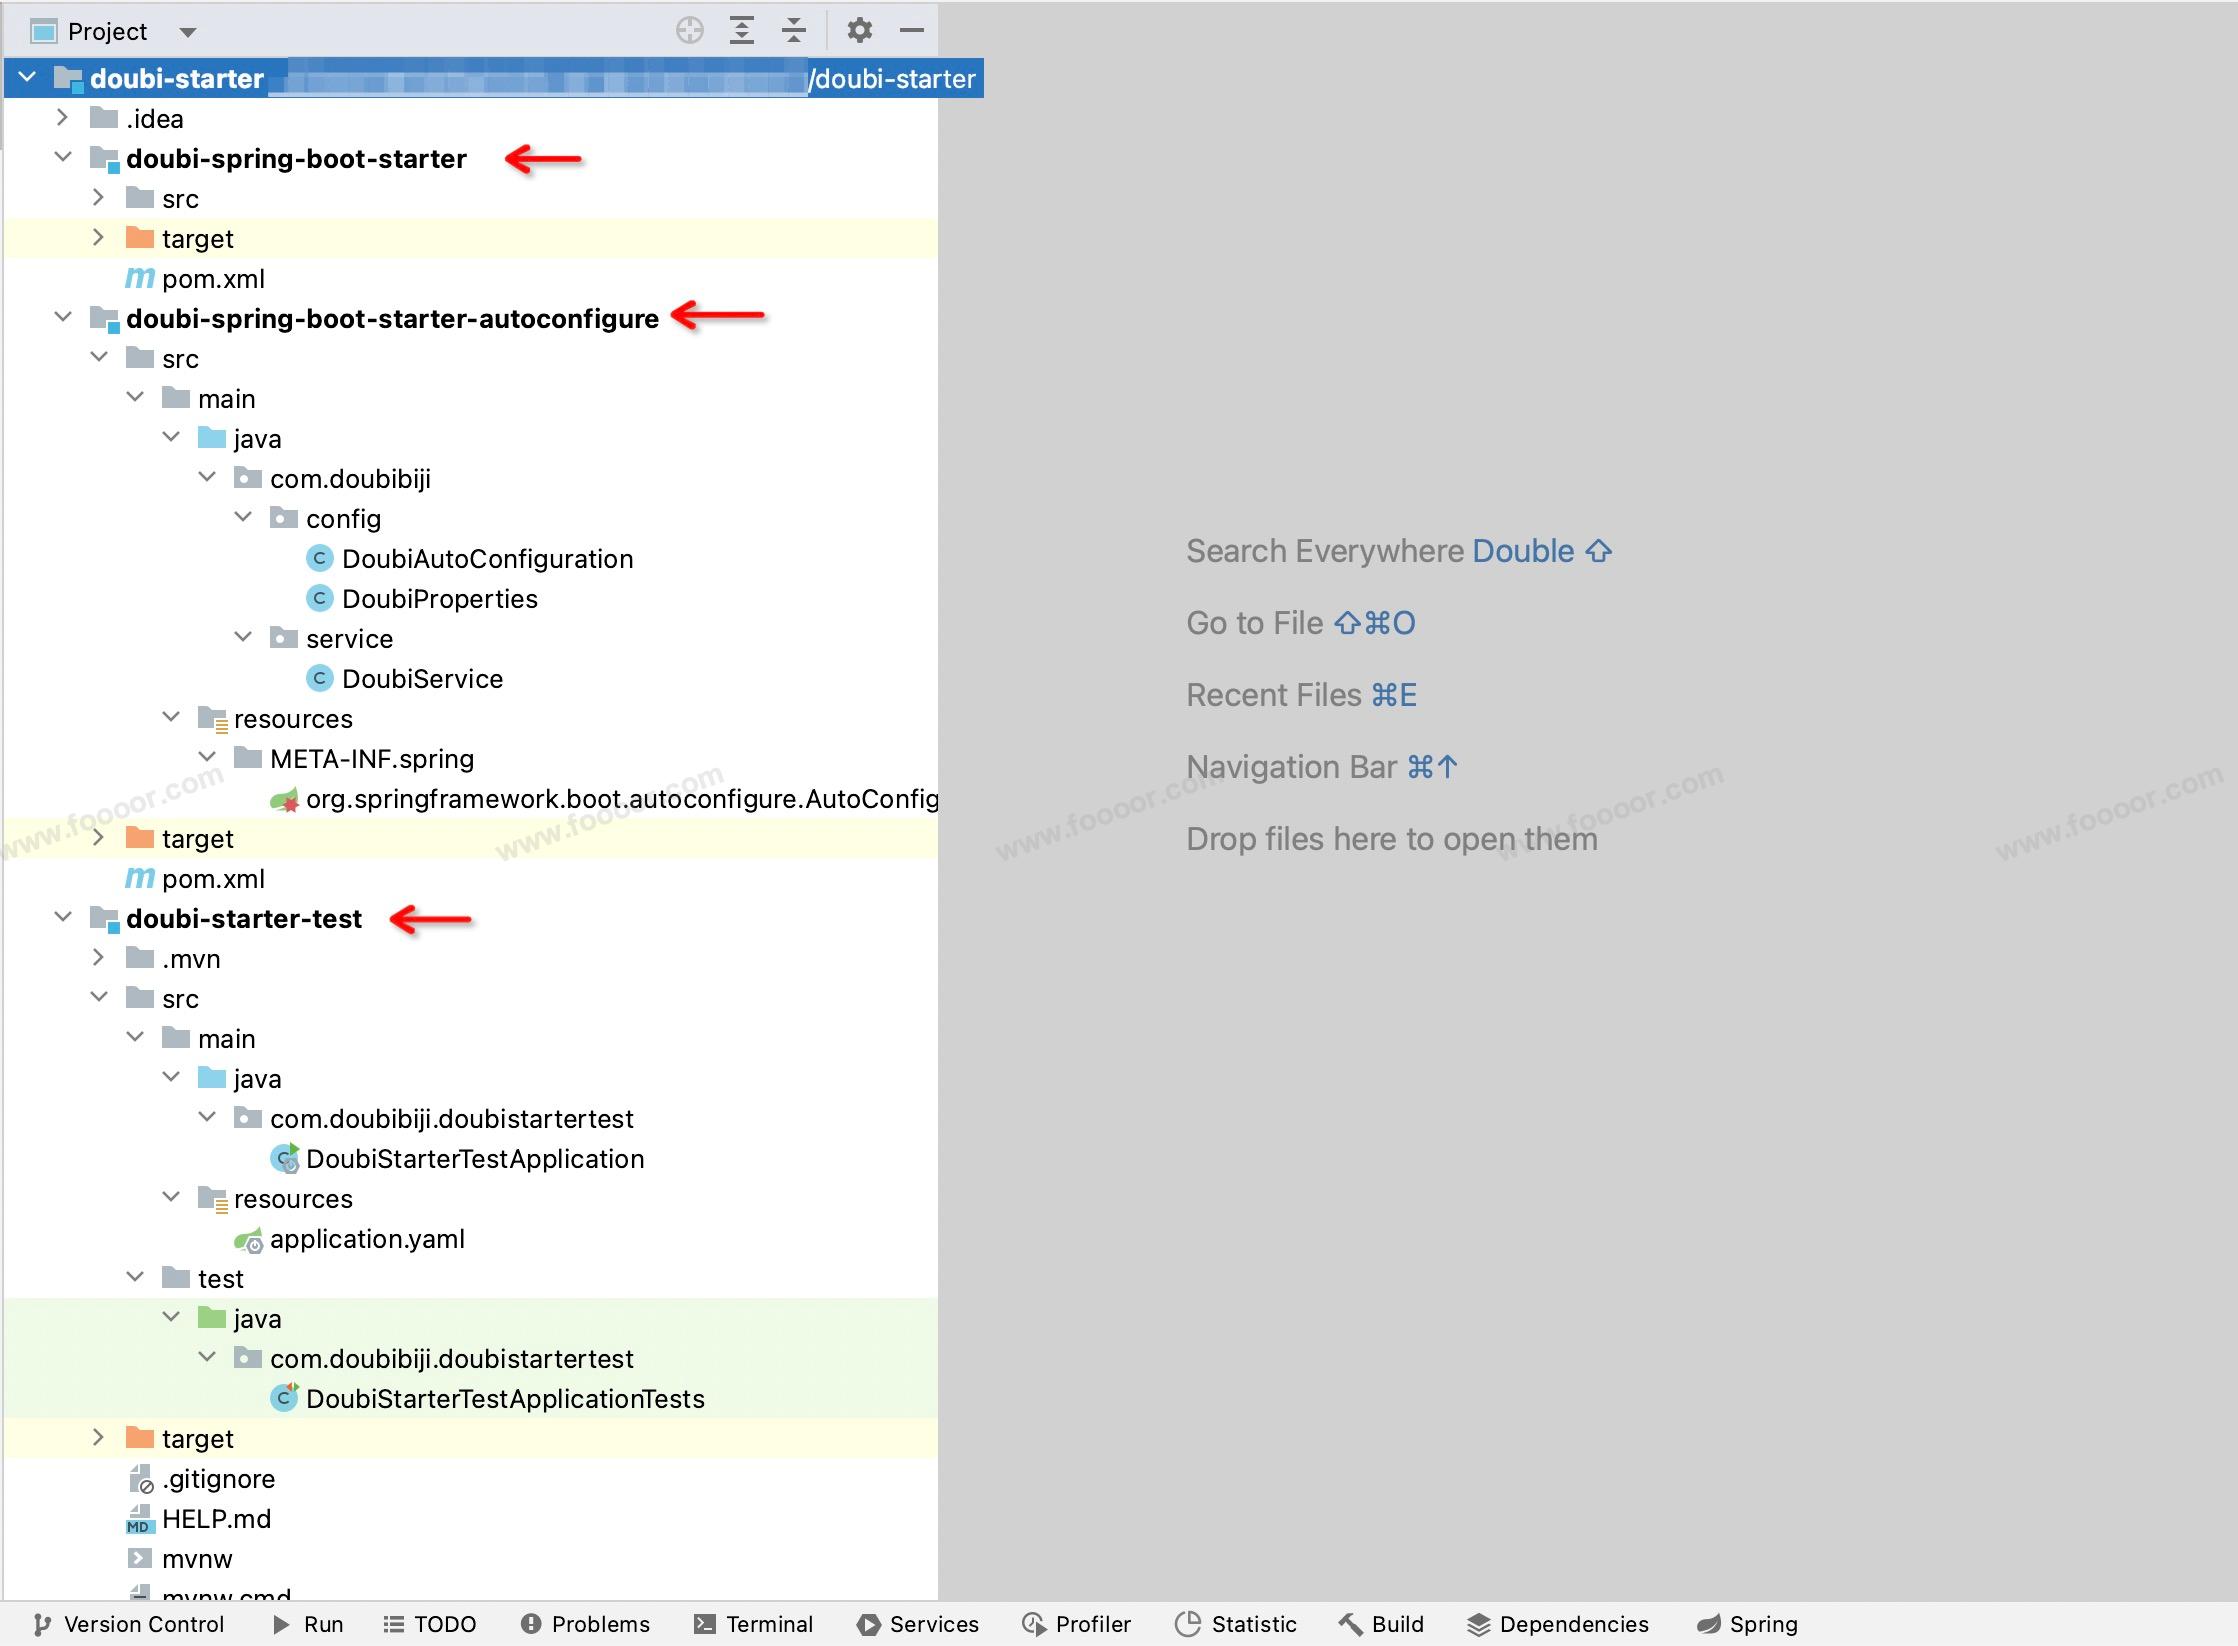
我的项目结构如下:
内容未完......